July 2007 -
Dan's business is booming........ so you might want to
check on delivery intervals for both the harness and the power block when you
place your order. That way you can schedule your work accordingly.
It's been 2 years of driving with the harness for me and there hasn't been a
single blown fuse........well except for the time or two I grounded a hot wire
by mistake. Note to self....always disconnect the battery when pulling various
components apart!
December '04
- February '05
Post Script right up
front :-) ...sort of like skipping to the end of the book!
I finished the
installation and testing of the harness on Feb 11, 2005 with only a few minor
problems that needed to be fixed. What follows is what I've learned over the 2
months working on this project:
Time:
-
I estimate that I've
spent 40 - 50 hours planning, laying out and doing the actual installation.
That time includes removal of assorted components (noted below),
installation of the power block, running the wires, installing (crimping
and/or soldering) the proper connectors and testing everything.
-
It does not include
wrapping all the wire with a split loom harness, re-installing everything I've
removed from the car and re-testing after everything's put back together. I'm
guessing another 5 - 10 hours of work are needed.
-
The job would be much
easier on a car being completely restored, as access to all parts of the car
would be "uncluttered". I'd guess that the installation time could be cut in
half or by a third.
Expertise:
-
If you can read and
follow (not necessarily understand) a wiring diagram and have some basic
soldering skills, you can install this harness.
-
While I've done a lot of
house wiring, I've never tackled any automotive wiring other then basic
stuff like installing a radio and fan.
Tools Needed:
-
Bullet Crimper - (http://www.britishwiring.com)
- It may cost $55 but it provides for a professional crimp of the bullet
connectors with no need to solder. There's probably 50 or more bullet
connections, with many in awkward locations that would be very difficult to
solder. With this tool, you can lock the bullet connector in the tool and
then slip the connector over the wire and squeeze it all together with just
one hand. The tool is automatic in that you have to squeeze to the proper
crimp compression or the tool won't unlock and release the connector. This tool pays for itself the first time you use it.
-
Terminal Crimper - Pick
up either the Klein ($20) or GB ($10) crimper at Lowe's, Sears or Home Depot. These tools
will crimp the full length of the connector as opposed to the cheap tools that
only do a very narrow crimp. I, however, could never get a proper crimp so I
elected to solder every connection except the bullets.
-
Mini-Butane Torch - (Torch
Picture) - People normally
solder with a soldering iron/gun but I found that the butane torch worked better
and faster with no need for a power cord. Basically the harness wire insulation has a
very high melting point while the solder has a low melting point. As a result,
the solder will flow well before the insulation even thinks of melting. I
probably soldered a hundred connections without melting anything or setting
anything on fire! You will have to be very careful when re-using some of the
original wire as that insulation will melt if heated too high.
-
Wire Tie "Gun" - This handy
tool pulls wire ties tighter then you can by hand or with pliers. Exact same
tool is $5 at Lowe's or $10 at Home Depot.... go figure!
-
Low Temperature Solder -
I got mine at Radio Shack. Make sure it's for electrical work.
-
Small Spring Clamp - 4-1/4" - (
Clamp Picture ) - An invaluable tool
for holding wire in place while soldering. The way you use it is only limited by
your imagination.
-
Multi-meter
- I picked up
Sears $40 unit on sale for $20 and it has every feature I need. Besides being a
great automotive troubleshooting tool, you can use it around the house for
testing everything from outlets to batteries.
-
Digital Camera - I took
pages of notes and drew lots of pictures but a digital picture is worth a
thousand words.
-
Bullet Pliers
- (http://www.britishwiring.com)
- If I knew then what I know now, I would have splurged the $30 and got these
time-savers too. You can snap the bullet connectors in with needle-nose pliers
but it's not as simple as it sounds.
Components:
-
All components are
extremely high quality
-
The wire even has a
unique 'feel" to it.
-
All wire is of much
thicker gauge so more space is taken up versus the original wire.
-
All connectors are
supplied though I'd recommend ordering more as noted below.
-
You'll have more wire
then you need, depending on any after market components installed on your
car.
Tips:
-
Test everything
electrical on your car BEFORE you begin work.... every bulb, light, switch,
wipers, washer motor, turn signals.... etc. etc.. I had a few bad bulbs and a
bad door switch that I discovered while testing the new harness. If I had
known they were bad before, it would have saved me some
trouble-shooting/testing time. Check everything and make notes on what
worked and didn't work.
-
I have the Electric
Maintenance Handbook that Dan wrote for the TR6 and I was constantly referring
back to the original wiring schematic as I worked with the new schematic.
-
Put car up on stands to
eliminate having to bend over as much.
-
Practice soldering with a
few short pieces of Dan's wire before starting on the actual car. It shouldn't take
more then 2 or 3 terminals to get the hang of soldering them.
-
Use heat shrink tubing on
every connector. You don't really need it on ground wire connections but it sure
looks a lot neater. On "powered" connections you may even want to cover the
connector itself with heat shrink tubing.
-
Before starting, inventory
all the wire and tie each separate loose wire into a coil with a wire tie. This
will make it easier to see what loose wires are needed for what connection. Once
you start the installation, it'll also show you what wires still need to be
used, if at all. Dan supplies wire for every conceivable component (original and
after market) so you'll probably have a number of coils you won't use.
-
Don't throw out any of
the wire until everything is put back together and tested. I had to go back into
the "already used" pile during my testing phase to fix a few things.
-
Order a bunch of extra
connectors from British Wire (
http://www.britishwiring.com/ ) Dan supplies a good selection of connectors
but how you actually run wire and make connections will determine how many you
actually need. I could not find the same quality of connector at any local
electronic store. I probably lost 5 days of work when I ran out of bullet
connectors toward the end of the installation.
-
I tried to minimize the
number of ground connections where possible. Just about all of my under hood
grounds come back to this one spot. For
under the dash they go to just two places and the trunk goes to one spot.
Parts Removed:
-
Battery and battery
tray
-
Radiator Shroud
-
Air Filters
-
Carbon Canister and
assorted hoses
-
Heater hoses from engine
to heater
-
Headlights
-
All Trunk interior panels
-
Wood Dash
-
All gauges
-
Heater & Demister hoses
-
Demister Vents
-
Eyeball vents
-
Glove Box
-
Kidney pads - both sides
-
Driver's Seat
-
Carpet on Driver's side
-
Driver's Seat Belt anchor
point
-
Driver's side mounting
point for top's frame
-
Driver's side rear
interior panel
-
In hindsight, I wish I
had taken the time to remove the metal dash, switch plinth and molded console.
Once you've done that, it's easy to get the heater out. Doing so just opens up
tons of room in which to work and will make for a neater installation. Plus,
with the heater box out you can flush that core, lube the fan and make it like
new!
Initial Reaction:
-
After running over
800 feet of wire and making hundreds of crimps, solders and connections
here's what was wrong: Brake light and back up light wires were reversed,
two wires on the electric fan switch were reversed, two wires on the oil
pressure switch were reversed and I had a few bad bulbs and one bad door
switch.
-
My initial perception of
the car itself from my testing: Lights are brighter, horn is louder, heater fan
sounds stronger as does electric cooling fan and the car starts better. My car
has always started OK but now it seems to jump to life immediately (stronger
spark maybe?) The car had sat for over 2 months in very very cold weather
without starting and it fired up almost immediately. Every subsequent start was
also immediate. I was pleasantly surprised to say the least.
Support:
Website:
On to the
actual installation!
December 10, 2004: Today I actually began on the
installation of the "state of the art" wiring harness produced by electrical
guru Dan Masters. When the harness first arrived I couldn't believe how heavy
the box was, but after opening it up and seeing how much wire was in the box, I
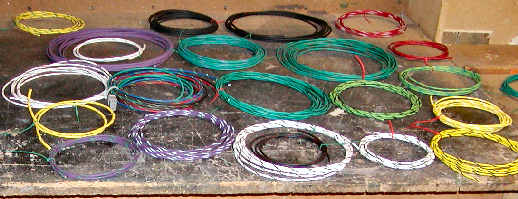
understood. In talking to Dan, I learned that there is over 800 feet of wire in a
TR6! Here's a view of all the wire laid out on my work bench.
Because of the number of
loose wires in the kit, I'd strongly recommend doing what I did i.e. take each
wire, coil and wire tie it. In doing so, you'll know what wires you've used (no
wire tie) and which ones you haven't (still wire tied). Dan gives you plenty of
extra wire length so it can get confusing dealing with all this wire and what's
been used or cut already.
I also found it helpful
to remove the following: battery, battery case, air cleaners, vacuum lines to
carbs, carbon canister, radiator shroud and coolant overflow tank. Doing this
just gives you more room to work. I also put the car up on jack stands to
minimize the amount of "bending over" and I removed the wheels for easier access
to the headlight buckets. Once I start work on the dash wires, I'll remove the
dash, all the gauges and probably the seats and carpet.
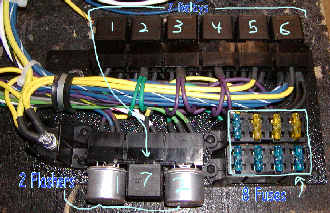
First up is the
power block which consists of:
7
Relays (power, fuel pump, cooling fan, horn, low beam, high beam and starter), 2
Flashers (hazard & turn signal) and 8 fuses. Coming out of the power block is a
9 wire bundle that terminates under the bonnet/front of the car, a 24 wire
bundle that terminates under the dash or in the car and the fuel pump wire.
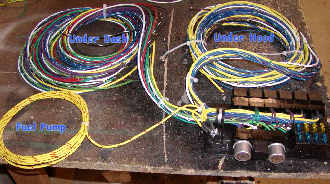
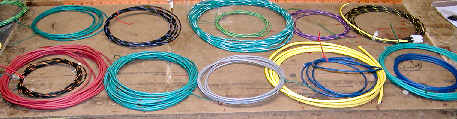
The next 2 pictures show all the individual wires
that terminate through out the car.
The wire insulation itself has a very different feel
to it.... I have an old email from Dan that describes it as "type SXL
cross-linked polyethylene, rated at 125 degrees C, spiral striped". Because of
the wire type, he had to buy it in 1000 foot rolls and now has over 85,000 feet
of wire :-)
Up Next..... Under
the hood/bonnet |


