| Rick's no
artist, but his software programs make him
look like one..... it all starts as a simple
drawing. |
 |
| Then it gets
put into his CNC machine for milling in
wood.........lot cheaper then going
straight to billeted aluminum. |
 |
| Here's the
wood pieces being test fitted to the
driver's seat. the blue arrows point to the
holes for the bolts that secure the seat to
the brackets. The green arrows for the bolts
to the TR6 floor and the red arrows are for
the aligning pins on the Miata seat rails. |
 |
| Once he got
it all set in wood, it was time to figure
out how to cut all eight pieces from one
block of aluminum! He's using 6061-T6
billet aluminum.... not cheap! |
 |
|
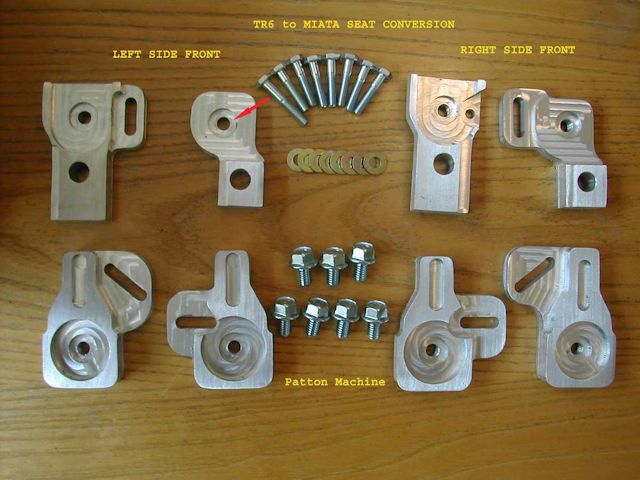
Here's the complete kit as delivered... the
one long bolt goes to the driver front right
side bracket... you'll see why later on. |
 |
| The
seat rails are covered in great detail in
another section on my site but here's
the showing how you'll need to bend the
brackets to get a straight flat rail.
Basically clamp it in a vice and bend it
until it's straight. |
 |
| This is the
front left passenger side bracket and you
can see the multiple cuts he made to accept
the shape of the Miata seat rail. The red
arrows is the cut the for basic shape of the
seat rail front mount. The blue arrow is for
a protrusion on the bottom of the front seat
mount. The pink arrow is the thread hole for
the flange bolt that secures the seat rail
to the bracket. The green arrow is the hole
for the seat rail alignment pin and the
black arrow is for the bolt that holds the
bracket to the stock TR6 mounting hole. |
 |
| In the
picture above, the green arrow points to an
alignment hole for a pin that's on the Miata
seat rail. In the picture below the red
arrow points to the pin. Unfortunately my
pins were cut off but Rick's design lets you
keep them to aid in alignment. Lay the
bracket over the seat rail and mark now much
of the tip protrudes through the bracket and
needs to be trimmed (green arrow). You'll
have to do this for both sides and both
seats. |
 |
| The seat rail
resting in the bracket.... too bad I didn't
color coordinate the arrows on both
pictures. |
 |
| The tr6 floor
has a "stepped" area that needs to be
accounted for so that's why there the groove
(pink arrow). |
 |
| When I
originally made up my own brackets I drilled
out the rivets that held the rear bracket to
the seat rail. With Rick's kit you need that
bracket, so I reattached it with hex head
bolts (two pink arrows). Whether you have
the original rivets of bolts, they fit into
the slot cut into the aluminum. Here you can
see the amount of detail in Rick's work.
Besides the rivets/bolts, there are two step
downs on the bracket.....the blue arrow
points to the big on and the green arrow to
a much smaller lip. In this picture the
arrow colors do match up for alignment to
show the machining detail. |
 |
| Here's one
problem that I had mostly due to the thick
padding I have under my carpet....much
thicker than normal. This is where the rear
inside bracket will go and there's a metal
reinforcement plate bolted to the floor. As
you can see, the plate is crooked and the
right side needs to pivot toward the
seatbelt. |
 |
| Just loosen
the bolt and it will pivot. BTW.........Rick
accounted for this piece by cutting a relief
groove in the bottom of the bracket, but my
padding was just too thick to let the
bracket sit properly. |
 |
|
My solution was
to use a spacer under the mounting hole. |
 |
|
The dotted white
line shows where the plate is and how the
spacer levels it all off. |
 |
| Passenger
side - Loosely position the four brackets on
the floor and set the seat in place. Move
the brackets as needed to get the seat rails
to sit properly, insert the flange bolts
(red arrows) through the seat rails and into
the brackets. Push the rear of the seat away
from the "B" Pillar and toward the tranny
tunnel.......and tighten the bracket bolts
to the floor (green arrows). On the
passenger side you won't be able to get a
wrench on the front inside bolt (yellow
arrow) soooo................. |
 |
| Here's the
passenger front inside mount...... next to
the tranny tunnel and the flange bolt (red
arrow) and the hold down bolt (yellow
arrow). As you can see, the hold down bolt
is covered and difficult to get a wrench on
it. I outlined the bracket location with
masking tape and removed the seat. |
 |
| I decided to
substitute a socket head bolt for the hex
bolt supplied.....it was just easier to
tighten it down. The tape shows the proper
orientation of the bracket. The Miata seat
rails has an alignment pin shown earlier
that needs to get trimmed and put in the
hole by the red arrow. |
 |
| So after
getting that front bracket secured, here's
the seat dropped onto the brackets and
bolted down with the flange bolts. |
 |
| And a view of
the rear side of the passenger seat. You can
see (green arrow) how I have the seat pushed
as far toward the tranny tunnel as possible.
The Miata seats are a tight fit at the "B"
Pillar and Rick's brackets give you a good
range of movement for the seat. |
 |
| Here's the
driver's side...... Red arrows point to the
bracket to floor bolt locations. |
 |
| Same
procedure at the passenger side. Get the
brackets loosely positioned, set the seat in
place and bolt it to brackets with the
flange bolts and then tighten the hold down
bolts. ONE EXCEPTION..........the inside
front bracket uses just one bolt that goes
through the seat rail, through the bracket
and into the stock TR6 mounting hole (red
arrow). As you can see the other side has
two bolts like the rest of the mounting
locations. |
 |
|
And a view of the
driver's rear seat bolted in place. |
 |
| |


